These stuffed peppers make a delicious main or side dish and you can use just about anything in the stuffing – a great way to use up bits and pieces of veggies and herbs in your fridge! You can also give them a unique international flair by adding spices to the filling while you are making it. Add cumin and chili powder for a Mexican flavour, dried basil and oregano for a Mediterranean flavor, or curry powder for an Indian flavour, or …. whatever your taste buds are desiring! This recipe is vegetarian, but you can easily make it vegan (alternate vegan suggestions included in the ingredient list). Enjoy!
You Will Need:

- 4 bell peppers (any colour, but I like using orange, red, and yellow)
- 2 medium onions, finely diced
- 2 cloves of garlic, minced
- 2 cups of cooked wild rice or quinoa
- 1 cup of diced tomatoes
- 1 cup of diced mushrooms (I used shiitake)
- 1 cup of canned chickpeas or lentils (I used chickpeas and roughly chopped them up a bit into smaller pieces)
- 1 cup of chopped up cooked spinach
- 4 TBSP of butter, or olive oil, or coconut oil, or a combo of these (I used 2 TBSP butter and 2 TBSP olive oil)
- 1/2 cup of grated Parmesan cheese (or vegan cheese) to put into stuffing, and a bit extra to melt on top
- 1 egg (or reserve 2 TBSP of the chick pea water and whisk it as a vegan egg substitute)
- salt and pepper to taste
- any spices or herbs you want to add (optional)
Step 1: Saute Onions & Mushrooms

Heat butter/oil in a skillet over medium heat. Add diced onions and mushrooms, salt, pepper, and any other spices or herbs you desire and cook until soft, about 3 to 4 minutes.
Step 2: Add Everything Else Except …
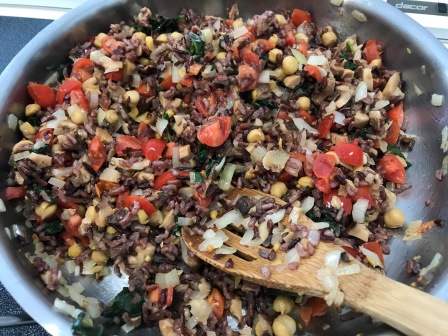
Add all the other ingredients to the skillet except for the eggs and cheese. Mix well and saute for 2 to 3 minutes. Taste mixture and season to your satisfaction. Turn off heat, remove skillet from heat, and set aside to cool. Just as an aside, this filling is so good, you could serve it as is as a side dish!
Step 3: Prepare Peppers

While the filling mixture is cooling in the skillet, cut around the top of the peppers – just enough so you can pull the stem and the attached seeds out. I cut up the flesh around the pulled off top and saved the pieces to add to a green salad I prepare to go with this dish. Arrange the peppers in a casserole that is just tall and wide enough to hold the peppers in an upright position. If you have any bell peppers that won’t ‘stand up’, you can always cut a tiny sliver off the bottom to level them out, but be careful not to cut a hole into the bottom as the stuffing will fall out! You can also cut the peppers open lengthwise if you’d rather serve them as ‘half-shells’. This is a great option if the peppers are on the large side and/or you want to serve them as a side dish rather than a main dish.
Step 4: Add Eggs and Cheese

Once the filling mixture is cooled, add the egg and 1/4 cup of the cheese into a bowl. Whisk together and stir into the filling. It is important that the filling is cooled before you do this step, otherwise you will get hunks of ‘scrambled eggs’ in your filling instead of having it evenly mixed in to act as a binder for the other ingredients in the filling.
Step 5: Fill ‘Em Up!

Spoon the filling into each pepper, pressing down gently to ensure they are well packed, and slightly mound the filling on top. Add a few ounces of water to the casserole dish, cover (with the casserole dish lid if it fits without squishing down on the peppers – or you can put a tented piece of aluminum foil instead), and cook at 375F for 50 to 60 minutes or until peppers are cooked to your desired texture. If you want to have some melted cheese on the top, add the extra cheese during the last 5 minutes of cooking time, then broil for a minute or two for a golden, bubbly finish!
Step 6: Serve and Enjoy!

When I serve these stuffed peppers as a main dish, I typically serve them whole and with a side salad. One stuffed pepper per person is typically enough.


 glyphosphate. There’s been lots in the news recently about how unsafe levels of glyphosphate are being found in children’s cereals and cereal bars because of the heavy use of RoundUp on the crops/ingredients used to make those products. The focus of these news reports has been on childrens’ cereals containing oats … but it could just as easily have been on products containing canola oils which is used in sooooo many packaged, processed, canned foods and condiments … and used in restaurants for cooking.


 The first article is entitled
  research to arrive at the recommended dose – and that doses of 2,000 IU (IU stands for International Units) per day can bring vitamin D levels into ranges that can help prevent the flu.” Yep – The Institute of Medicine made a mistake.
 I personally take 2,000 to 4,000 IU per day, depending on the time of year (lower dose in spring and summer; higher dose in fall and winter), and if I feel I am coming down with something, I will take 8000 IU for several days. I have had my vitamin D levels tested, asked for the results, and compared them to what is
 I love basil … and all the other ingredients that go into making this delicious pesto. The basil in my garden is always amazing and I never want a single leaf of it to go to waste. This pesto is easy to make and freeze and it’s great on pasta, fish, chicken, and veggies, and it’s a yummy addition to wraps, salad dressings, and dips (or use it as a dip!).
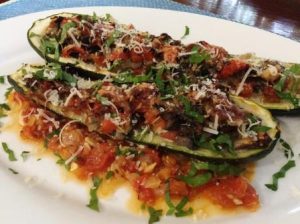 I usually have zucchini coming out of my ears at this time of year. While this wasn’t the case this season, I did get enough to make stuffed zucchini a few times. You can use whatever veggies and other ingredients you like for the stuffing – no need to stick to what I’ve used!
 It takes about 10 minutes to make this yummy pasta dish, Easy peasy quick and delicious dinner that’s easy to make for one or many. Buckwheat pasta is a great alternative to wheat-based pasta – not just because it’s gluten-free but because it’s loaded with nutrients.
 I try to avoid starchy side dishes such as rice and potatoes. An easy, delicious and nutritious alternative to both is cauliflower. In this recipe, I’ll be showing you how to make roasted cauliflower as a substitute for roasted potatoes. It’s super-easy, delicious, and packs a greater nutritional punch compared to roasted potatoes.
 This recipe incorporates two of the most nutrient-packed veggies into one delicious casserole! Kale and sweet potatoes are loaded with fibre and nutrients, especially beta-carotene, which our body can convert into Vitamin A. Beta-carotene and vitamin A offer numerous health benefits, including modulating our immune and inflammatory responses, which are critical to overall health. Kale is also a great source of two important bone-building nutrients, calcium and vitamin K. Bon appetit to that…or should I say Bone appetit…sorry, couldn’t resist!
 I love the look and taste of red cabbage – and its more than just a pretty face…I mean more than just a pretty head! Its beautiful rich colour is due to a high concentration of powerful antioxidants called anthocyanin polyphenols. Research shows that these antioxidants boost immune system function and deliver protection against inflammation and numerous diseases, including cancer and cardiovascular disease. Red cabbage is also loaded with vitamins and minerals and contains up to 8 times more vitamin C compared to green cabbage. In fact, a cup of cooked red cabbage provides 85% percent of the recommended daily intake of vitamin C! No wonder Mother Nature provides us with this veggie just as cold and flu season arrives. This recipe turns red cabbage into a delicious sweet-and-savoury side dish that goes particularly well with red meat mains.