Roasted Butternut Squash Coconut Ginger Soup

When the colder weather hits, it’s nice to have some homemade soup to keep us warm. Try this Roasted Butternut Squash Coconut Ginger Soup on a cold fall or winter day. It freezes well and is also a great thermos lunch.

What You’ll Need

    • Small to medium butternut squash (about 4 cups)
    • 1 sweet onion
    • 2 cloves of unpeeled garlic
    • Olive oil
    • Sea salt
    • Pepper
    • 1-2 tablespoons of butter
    • 6 cups of organic chicken broth
    • 3-4 tablespoons of coconut milk
    • 1 tablespoon ginger root

Step 1: Prep

IMG_0309Into a roasting pan, add peeled, de-seed, and chopped butternut squash, a coarsely chopped large sweet onion, and 2 cloves of unpeeled garlic. Drizzle with olive oil, sprinkle with sea salt and pepper, and toss to coat. Cut about 1 to 2 tablespoons of butter into little pieces and sprinkle on top. I rarely measure when I’m cooking, but I probably ended up with about 4 cups of cubed squash (it was a small to medium sized one). Put into a 350F preheated oven.

Step 2: Cooking

IMG_0312

Roast for 30 to 40 minutes (give it a good toss/stir every 10 minutes or so) or until the squash is completely soft and the onions and garlic cloves are nicely caramelized. It looked gorgeous and it smelled amazing!


Step 3: Cooking

IMG_0313Dump the contents of the roasting pan into a large pot and add about 6 cups of organic chicken broth, or at least enough to completely cover the roasted veggies.  You can add more broth now or later depending on if you like a thin or thick pureed soup. If you can spot the garlic cloves, remove their skins (just squeeze the cloves out). At this point, I added 3 or 4 tablespoons of coconut milk and a tablespoon of finely grated fresh ginger root (I keep my ginger root in the freezer – SO much easier to grate it when it’s frozen!) These additions are optional if you don’t like coconut and ginger (really???). Bring to a boil, then turn down heat to low and simmer for 10 to 15 minutes to let all the flavours blend.

Step 4: Preparation and Serving

IMG_0318After you’ve let the soup cool a bit (you know what happens when you fill a blender with piping hot stuff and turn it on…EXPLOSION), pour it into a blender and puree until creamy and smooth (or whatever consistency you like your soup to be). Pour it back in to the pot, taste, season as necessary, warm it back up again, and serve. If you find it too thick, you can add more broth or even a bit of water. It’s easy to make it thinner at this point…not so easy to make it thicker!

Such beautiful colour and texture – and it was delicious! Any left over soup can be kept in the fridge for a few days, or frozen for months. A great thermos lunch too. Hope you enjoy!


Will You “Stress It or Bless It”?
Five Tips to Manage Holiday Stress

It’s starting. I’m hearing stories of how stressed people are getting about the holidays. They’re worrying about the expectations surrounding gifts and family get-togethers, over-indulging, and having way too much to do with only two more weeks to get it all done.  Given the numerous ill-effects that stress has on our health, including our immune system (one of the reason why so many people get sick at this time of year), if we can’t find ways to minimize our stress, we can at least do a few things that will help our bodies and minds deal with it.

cropped with DMI first heard the expression “bless it, don’t stress it” about 15 years ago from Dr. Dorothy Marshall, co-founder of the Marshall Health Clinic and the International Academy Health Education Centre.  I was, and still am, very fortunate to be under her guidance and mentorship.

Early on, Dr. Marshall shared two valuable pieces of advice that I do my best to embrace every day. The first one was “bless it, don’t stress it” and the second one was to “strive for progress rather than perfection” –  two things that many of us tend to forget – especially over the holidays, which is likely a time when we could benefit from them the most.

Last year, my December Tip of the Month, The Twelve Tips of Christmas, offered twelve nutrition-related tips aimed to help you enjoy all of the treats and indulgences that come with the holidays without totally blowing it. With a focus on “progress rather than perfection”, incorporating even just one of those twelve tips would be meaningful.  I’ll be recycling the twelfth tip, Bless It, Don’t Stress It, in this month’s post.  So, apart from the common advice that often gets shared at this time of year, including getting enough sleep, keeping up with your exercise, and continuing to strive for healthy food choices, here are five tips that can help you stay merry.

 1. Get a Stress-Busting Treatment

reflex3Many natural modalities have been shown to enhance the body’s ability to cope with stress. These include, and are not limited to, massage, acupuncture and reflexology.  A lot of people love this option as they can relax while someone else does the stress-busting work for them.  The first time I went for a foot reflexology session, I loved it so much that I decided to get training so I could offer this amazing treatment to others. Reflexology is so much more than a ‘foot massage’. While it definitely is a treat-for-the-feet, when properly done, reflexology offers numerous health benefits that affect the entire body, including releasing tension, reducing stress, and promoting relaxation.  If you would like to gift yourself or someone you know with a health-boosting, stress-busting reflexology session, you can purchase a gift certificate here. Simply select the ‘Custom Amount’ option from the drop down amount menu, enter $60, then follow the instructions to complete the purchase. In a few quick steps, you’ll be all set with a unique gift idea that will make someone healthier and happier!  Interestingly, wishing others health and happiness has been shown to reduce our own stress, so whether you gift yourself or someone else with a reflexology session, either way, you benefit! This leads nicely into the next tip.

2. Send Some Loving Kindness

Red Heart ShapeA few months ago, I read an article in Dr. David Williams’ Alternatives newsletter that was all about balancing our stress response.  The newsletter shared many new research findings related to this topic, including something called ‘Loving Kindness Meditation’. Researchers at the University of North Carolina found that this type of ‘meditation’ strengthens the vagus nerve. A critical role of the vagus nerve is to help the body recover from stress. The stronger our vagus nerve is, the more efficiently our body recovers from stress.  So how do you go about loving kindness meditation? It sounds pretty easy.  First, find a quiet place, make yourself comfortable there, close your eyes, focus on your breathing, and visualize someone you know – it may even be you! Next, focus your attention on everything you like about that person (let’s call them John) so that you start to feel warm and fuzzy towards them.  Next, you repeat the following:  “May John feel safe; May John feel happy; May John feel healthy; May John feel at ease.” Once you’ve sent John some heart-felt virtual loving kindness, you can shift your focus to someone else and repeat the process. According to the article, doing this at least once a day can strengthen the vagus nerve. Pretty cool, huh?

3. Give and Receive Hugs

hugs catStress of any kind makes our adrenal glands secrete cortisol, which is our main stress hormone. Elevated cortisol levels can have numerous ill-effects on our overall health and well-being, including sleep issues, depression, feeling overwhelmed, and weight gain or difficulty losing weight. Research has shown that there is a hormone that can suppress cortisol, and that hormone is oxytocin. Most people associate oxytocin with promoting uterine contractions; however, recent research is calling oxytocin ‘the love hormone’ … and believe it or not, both men and women can stimulate its production by giving and receiving hugs. One of my daughters is studying Neuroscience and recently shared a link with me regarding a Ted Talk on oxytocin. It was so interesting, I watched it a couple of times. Having an Italian background, giving and receiving hugs comes naturally to me, so I love that hugging  has been shown to be an oxytocin-promoting (aka stress-busting) activity. I’m sending you a virtual one right now!

4. Try a Cup of Calmness

Flowers Floating in Herbal TeaThere are a lot of herbs that help our body deal with stress. Three very effective ones are valerian, hops, and passionflower. They are all available as teas, either as single varieties or as blends. Try having a few cups during the day instead of automatically going for another cup of caffeinated coffee. While many people think of coffee as a ‘pick-me-up’ during stressful times, one of the things caffeine does is stimulate your likely already overworked adrenal glands to pump out more cortisol (remember, cortisol is our main stress hormone and levels are likely already up there without the help of coffee).  If you’re not a tea drinker, these herbs are also available in supplement form. A product that delivers good results is V.H.P. by Biotics Research Canada.

  5. Bless It, Don’t Stress It

cake stress it bless itWhen you do have the occasional holiday indulgence, it’s important that you thoroughly enjoy it. Stressing over it will set off a negative emotional and physiological cycle that won’t do you any good. Shifting from stressing to blessing can be as simple as what you say to yourself or others; for example, which sounds better to you: “I think I’ll treat myself to a piece of cake” versus “I think I’ll cheat and have a piece of cake”.  I’m not implying that you can eat desserts and drink eggnog with every meal for weeks and just wish the ill effects away; after all, the definition of a ‘treat’ is something that is out of the ordinary – something that we do once in a while, and thoroughly enjoy. Remember, in the end, it’s likely not a few days of holiday indulgences throughout the year that are going to do you in … just as going on a diet for a few weeks in the New Year isn’t likely going to lead to meaningful changes that will last a lifetime.  By keeping moderation in mind, and reviewing my December 2012 Tip of the Month, I trust you’ll be able to eat, drink, and stay merry over the holidays.

Merry Christmas and Happy Holidays!

Yours in health,

Anna

Sweet Misery – Sugar Balance and Health

November is National Diabetes month, so perhaps you would think that this month’s tip is going to focus on what you can do to prevent or reverse diabetes (yes, both are possible); however, it’s not. This month’s tip is intended to make you aware of the numerous other health issues you may be experiencing right now that are associated with eating sugar and anything that turns into some form of sugar, including grains, rice, corn, starchy foods, and anything that is made with them.

Sugar is Hiding Everywhere!

hidingStart reading the labels on packaged goods that you purchase, and you’ll likely discover that sugar is listed as an ingredient at least once – and likely multiple times – as there are so many forms of sugar being used now: corn syrup, rice syrup, agave syrup, dextrose, maltose, maltodextrin, barley malt, evaporated cane juice, fruit juice concentrate, mannitol, glucose-fructose, high fructose corn syrup (often cited as the WORST offender), blah, blah, blah, blah, blah! The list goes on and on; in fact, earlier this week, someone sent me a picture of the ingredient label of a well-known table salt, and sugar was listed! That’s just one reason to use natural, unprocessed sea salt! I’m not saying that we can never eat or drink anything with sugar in it ever again, but chances are most of us should be cutting back a little…or maybe a lot.

Scary Stats

increaseWhile I’m not focusing on diabetes, we shouldn’t ignore the fact that according to the Canadian Diabetes Association, more than 9 million Canadians are living with diabetes or prediabetes. That’s just over 25% of our population! How can we ignore that? We also shouldn’t ignore the fact that Adult Onset (Type 2) diabetes is no longer an adult disease, as it is being diagnosed in children at an alarming rate, and that Alzheimer’s disease is now being referred to as Type 3 diabetes. Why on earth is this happening, and what can be done about it?

It’s Not Just About Diabetes

In my opinion, the issue with sugar consumption and blood sugar balance isn’t just whether or not you get a diabetic or prediabetic diagnosis, but rather if your nutritional and lifestyle choices are moving you towards healthy or unhealthy blood sugar levels – it shouldn’t be about a ‘yes’ or ‘no’ diagnosis! Do you really want to wait until you are diagnosed with diabetes or prediabetes to take action?

Over the years, I’ve read a lot of studies that linked various health conditions to sugar consumption and blood sugar imbalances. What if I told you that some of these studies showed that blood sugar issues can:

  • suppress your immune system, making you more susceptible to catching colds and flus, and increasing the risk of more serious diseases such as cardiovascular diseases and cancer
  • weaken your bones and lead to osteoporosis
  • raise ‘bad’ cholesterol numbers and decrease ‘good’ cholesterol numbers
  • affect behaviour, learning, and mood
  • cause issues with the digestive system, including increasing the risk of food sensitivities, Crohn’s disease, and ulcerative colitis
  • cause multiple nutrient deficiencies which will have widespread consequences throughout the body
  • increase your risk of developing Alzheimer’s disease
  • make it virtually impossible for you to lose weight

Weighing ScalesThe last point is especially important given the epidemic we are seeing with people being overweight or obese (both are risk factors for numerous other health issues). Interestingly, the hormone that balances our blood sugar, insulin, has a lot to do with our ability to burn fat and lose weight. Why? Because insulin is known as a ‘fat-storing’ hormone; that means it is physiologically impossible to burn fat/lose weight without balancing our insulin level, which depends on our blood sugar level.

Ready For An Ounce of Prevention?

You’d be surprised at the number of factors that affect our blood sugar and insulin levels including what, when, and how we eat, what we drink, how we handle stress, lifestyle choices, and supplements.

For more information that will help you balance your blood sugar and insulin levels, which will in turn positively impact so many areas of your health, I invite you to attend a workshop I’ll be holding on Tuesday November 26th, from 7pm-9pm at the International Academy Health Education Centre, 380 Forest Street, Ottawa ON. As usual, you’ll get loads of practical tips and tools that you can start putting in to practice right away. You’ll also receive informative handouts and an opportunity to win one of several great door prizes. For more information or to register, click here.

In the meantime, here are a few nutritional tips that can help to balance blood glucose and insulin levels, and a recipe that incorporates all of them!

  • Eat more high fibre foods, especially vegetables. Dietary fibre, especially those that are water-soluble, such as pectin, have been shown to have anti-diabetic and insulin-regulating properties. Foods high in pectin include: apples, pears, citrus fruit, carrots, beets, cabbage, onions, artichoke, okra, fennel, and squash; in fact, research is being done regarding the use of pectin from certain types of squash as a food additive.
  • Eat more healthy fats, especially coconut oil. Coconut oil has been found to help regulate blood sugar levels, improve insulin sensitivity, increase metabolism, and promote weight/fat loss.
  • Add cinnamon. Research has shown that as little as ¼ to ½ teaspoon of cinnamon per day can lead to approximately a 20% drop in blood sugar.

  • Use natural, unprocessed sweeteners. For those times when you do want to add a little sweet to your life, use sweeteners such as local raw honey or pure maple syrup. Remember that these are still sweeteners, so they should be used in moderation.

There are so many other great things you can do to promote healthy blood sugar and insulin levels, which in turn will promote a healthier more vibrant life! I look forward to sharing them with you at my workshop.

Take control of what you can!

Yours in health,

Anna

Chicken Stock

This stock will be a delicious foundation for amazing soups, stews, sauces, and gravies, so it’s great to have some on hand at all times. It’s also great for drinking straight up! Chicken stock is known to have anti-microbial properties which can boost the immune system and heal the gut. It is also an important part of the GAPS™ protocol.

What You’ll Need

  • A stock pot or any pot big enough to hold a whole chicken and then some
  • 1 whole chicken (pastured is best). You can also use 2 or 3 pounds of bony parts, like wings, necks, or a couple of left over carcasses. The next time you roast a whole chicken, freeze the left over carcass so you can use it to make stock another time! The more parts of the chicken you use, the more nutrient-rich your broth will be. If you have access to, and are OK with using the ‘innards’ (liver, heart, giblets, etc), head, and feet, put those in the pot too…if not, you’ll still have a nutritious and delicious broth.
  • 12 – 16 cups of filtered water (enough to completely cover everything in the stock pot)
  • 2 tablespoons of vinegar or fresh squeezed lemon juice
  • 1 large onion, coarsely chopped
  • 2 large carrots, peeled and coarsely chopped
  • 3 celery stalks, coarsely chopped (continued on next page)
  • A handful of parsley sprigs (I usually put in around 10 large sprigs – you can use the entire bunch if you like!)
  • 1 – 2 teaspoons of unprocessed/unrefined sea salt (season to taste)

Prepping

  • Chop up the chicken into a few big pieces to allow more of the bones, cartilage, and other tissues to be exposed to the cooking liquid
  • Put all the ingredients (except the parsley) into the pot and let ‘rest’ for about an hour. This will allow the acidic vinegar or lemon juice to draw minerals from the tissues (especially the bones)

 Cooking

  • Bring to a boil for a few minutes.
  • You’ll likely notice some ‘scum’ starting to form around the top of the pot. Skim off as much of this as you can with a spoon and discard it.
  • Reduce the heat to low, so that you get a gentle, slow, steady simmer.
  • Simmer for at least 6 hours. I usually start my stock first thing in the morning and let it simmer until supper time. The longer it simmers, the more rich and delicious it will be!
  • About 20 minutes or so before you take it off the heat, throw in the parsley. Parsley is loaded with minerals which will make their way into the broth.

 Finishing

  • Once the stock is done, remove all of the chicken from the pot and put it aside in a big bowl.
  • Let the chicken cool just enough so that you can handle it, then remove every bit of meat off of the bones. You can use this meat in sandwiches, stews, soups, tacos, and any dish you want to add chicken to. I like to chop it up coarsely and freeze it in a few portions of various sizes.
  • Next, using a slotted spoon, remove the vegetables from the stock. You can serve them with a meal, or if you are going to use some of the stock right away, you can chop them up and put them back in the stock (if that works with the recipe you have in mind). Otherwise, once everything is out of the stock, strain it through a fine sieve. You may want to do this a couple of times (rinsing the sieve out in between strains) to get a nice clear stock.

 Stocking up on Stock

  • If you are not going to use all of the stock right away, pour it into large mouth mason jars (or any other sealable glass container), leaving a couple of inches space at the top.
  • Seal the jars/containers and let them cool a bit, then put them in the fridge.
  • Once they’ve completely cooled in the fridge, you should notice a nice layer of fat that has risen and solidified on the top. If you used a pastured chicken, this fat is very healthy and should be used with the stock, or skimmed off and saved in the fridge in a glass jar as it is excellent for high temperature cooking (great to roast veggies in!).
  • Stock should last in the fridge for 4 or 5 days, or you can freeze it for up to 12 months. When I made stock, I make a ton of it so that I will have lots to freeze and always have on hand. Make sure you label the jars/containers with the date so you know how long you’ve had the stock in the fridge or freezer. You can write the date on a piece of masking tape with permanent marker and stick it on!

chicken broth in glass jar web version

Enjoy!

Roasted Pumpkin Soup

IMG_0320

This recipe makes about 8 servings. The soup freezes beautifully, so even if you are just cooking for one or two, if you follow this recipe, you will be able to stash some away for another day.

What You’ll Need

pumpkin soup supplies web

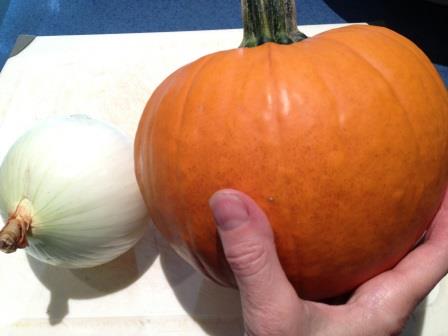
  •  A cooking variety pumpkin (large enough to render 4 cups of cubed pumpkin – I used a sugar pie pumpkin)
  • I large onion
  • 3 TBSP organic butter
  • 3 TBSP organic coconut oil
  • Sea salt
  • 6 to 8 cups of organic chicken stock/broth (homemade is best if possible)
  • Fresh ginger root (optional)
  • Organic sour cream (optional)
  • Chopped fresh parsley (optional)

 Prepping

IMG_2270 pumpkin soup prep 2 for web

  •  Cut the pumpkin into quarters and then thick slices. Scrape out the seeds using a spoon (save them if you want to roast them).
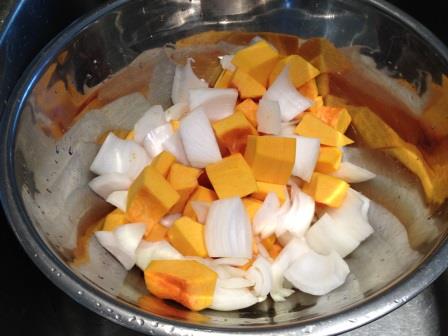
  • Remove the skin using a paring knife or peeler, then cut the pumpkin into 2 inch cubes. You should end up with about 4 cups of cubes
  • Cut the onion into large chunks
  • Melt the butter and coconut oil on low heat (on the stove or in the oven) until just liquefied
  • Place pumpkin, onion, and butter and oil mixture into a large bowl and toss together until veggies are well coated

Cooking

pumpkin soup roasting done for web pumpkin soup in pot cooking WEB

  •  Spread veggie mixture onto a couple of parchment paper lined baking sheets
  • Bake in a 300F oven for about 30 minutes, until just soft and a bit golden
  • Put the roasted pumpkin and onion into a large soup pot and add 6 to 8 cups of organic chicken broth (you want to completely cover the pumpkin and onions with the stock – it should be an inch or two above them) Add a teaspoon of unrefined sea salt, bring to a boil, then turn the heat down to low to bring mixture to a simmer. Add 1 tsp each of finely grated fresh ginger root and cinnamon (you can use more or less of each – suit your taste). Simmer for 15 minutes.

Finishing & Serving

  • Puree soup using a hand-held immersion blender, or let soup cool and puree in a blender (if using this method, return the pureed soup to the pot and reheat to desired serving temperature. Give it a taste and add more salt, cinnamon, or ginger if desired.
  • Serve with a small dollop of organic sour cream and sprinkle with whole or chopped parsley (optional).
  • Enjoy!

pumpkin soup done in pot WEB


Frozen Freshness: Enjoying Local Tomatoes Year-Round

For those of you who follow Perfect Resonance on Facebook, you know that I’ve posted a lot of photos of my veggie garden this season. I love being able to grow my own vegetables, not only for the obvious nutritional benefits, but also for the enjoyment I get from spending time in the garden.

For me, there’s no better way to start the day than spending some peaceful time in the early morning connecting with nature in my own backyard.

Because I’m Italian, it’s no surprise that much of my garden space is devoted to tomatoes. Even though I’m eating tomatoes at breakfast, lunch, and dinner, my tomato plants are so prolific this year (thanks to healthy seedlings and some gardening tips from local Master Gardener Tom Marcantonio), I can’t keep up with ways to serve fresh tomatoes!

There’s no way I want to waste a single one of these beauties, so I’m preserving whatever I don’t use fresh right now in order that I may enjoy their vine-ripened goodness in sauces, stews, soups, and more, throughout the snowy, sub-zero months to come.

Yes, they are coming…

Canning & Freezing Tomatoes Just Like My Mom and Dad

My mom and dad always canned tomatoes, and I did it for a couple of years too. It was pretty labour intensive and time consuming, so I’ve adopted a hassle-free preserving method that suits most of my tomato-including recipes just fine, and that is to simply freeze them whole. All you need are: whole local vine-ripened tomatoes, freezer bags or freezer-storage containers, and most importantly, freezer space.

My Quick 5-Step Process

Step 1: Pick or buy vine-ripened, local tomatoes.

Step 2: Rinse them in the sink under running water to get all the dirt off.

Step 3: Dry them thoroughly, and cut out the core, as well as any bruises or spots/scars (basically, cut out anything you wouldn’t want to eat if you were going to eat them fresh).

Step 4: Place the tomatoes on wax paper or parchment paper lined cookie trays (or any other freezer-friendly dish or tray that will fit in your freezer) so that they are not touching and place the trays (with the tomatoes on them!) in the freezer until the tomatoes are frozen solid. Depending on the size of the tomatoes, they should be frozen in 3 or 4 hours. You can leave them overnight too.

Step 5: Transfer the frozen tomatoes into freezer bags or containers, seal well, label the freezer bags/containers with the date, and immediately return them to the freezer and store until you need them.

Enjoying Frozen Tomatoes

Whole frozen tomatoes should keep for up to a year, but it’s best to use them within 6 months or so. It’s also best to thaw the tomatoes out before using them. Simply place them in a bowl until they are completely thawed, then drain off any excess water.

Be aware that frozen tomatoes lose their texture, so when you thaw them, they’ll be pretty mushy. They may also lose a bit of their flavour, but overall, they’re perfectly fine for use in cooked dishes that call for some tomatoes. If you don’t want to use the skin, just run lukewarm water over the frozen tomato and you should be able to pull the skin off pretty easily.

Why Bother Freezing Tomatoes?

Why do I bother doing this when I can buy tomatoes at the grocery store all year round?

Unfortunately, since fully vine-ripened tomatoes are quite delicate, many commercial operations harvest them when they’re still green so that they can be more easily packaged and shipped. These green tomatoes are exposed to ethylene gas to turn them red, so they look ripe without actually having gone through a natural ripening process which allows them to reach their full nutritional value. That’s one of the reasons I freeze my own tomatoes. In fact, at certain times of the year, it’s likely that store bought canned tomatoes will be higher in nutritional value than the fresh tomatoes available in the produce department.

There’s nothing better than eating locally and in season! Tomatoes are among the easiest vegetables to grow, so if you’ve never tried it, consider planting some next year. They do very well in pots if yard space is an issue, and remember that they do like full sun.

I recently posted my Tomato and Basil soup recipe on my Facebook page. It’s delicious! To learn about the amazing health benefits of tomatoes, why people with arthritic conditions may have to avoid them, and one of my favourite ways to enjoy them, check out my September 2008 Tip of the Month.

Yours in health,

Anna

Zucchini (grainless) Spaghetti

My family does its best to avoid wheat, starchy grains, and anything made from them. That includes spaghetti, and for many families, spaghetti is a quick and inexpensive meal. Many of my clients who are avoiding grains, in particular wheat, say the one thing they sometimes miss is spaghetti. With this recipe, you can have your spaghetti and eat it too! I’m Italian, and I can honestly say that this recipe is a delicious alternative to grain-based spaghetti. Enjoy!

Zucchini is a great veggie to turn in to spaghetti! Since it has such a mild taste, it will take on the flavour of whatever sauce you mix it with. This time around, I used a tomato sauce, and raw milk, sheep feta and minced, fresh mint as toppings. This recipe idea is courtesy of my daughter. I prepared the zucchini, she did the rest!

Step 1: Prep

IMG_1436First you need to get yourself one of these – a julienne peeler. You can find them just about anywhere kitchen gadgets are sold. I picked this one up for about $7.00. You can buy more professional ones that will allow you to julienne just about everything. A mandolin would work too.

Next, you need to get yourself some zucchini (there were loads in our garden when we made this). We used green and yellow ones. 1.5 to 2 small to medium sized zucchini is plenty for one moderate serving, or two smaller ones. To start julienning, put the zucchini on its side on a flat surface like a cutting board, and run the peeler along its length. You’ll get lovely long strands. Continue until you hit the seeds, then repeat on all sides.

IMG_1427Yellow one done! Now on to the green one to add some colour. I love this peeler! It’s so easy and fun! Oh oh….I think I’m going to be julienning everything in sight for the next few days…

All done! I just used one yellow and one green zucchini. It was enough for 2 small servings (or one larger serving). I bet carrots, or yams, or butternut squash would be yummy to add – and also make it more colourful (especially if you used a few heritage carrots!).


 Step 2: Cooking

Sauté the julienned zucchini in a large skillet over medium-low heat with a few tablespoons of olive oil and one clove of crushed or minced garlic. Stir and sauté until soft, but still a bit crisp (like ‘al dente’ spaghetti). My daughter cooked these ones for just under 5 minutes.

IMG_1430 IMG_1431

We had some left over tomato sauce, so we heated it up in a separate pot and then stirred it in to the pan. We’ve also used a putanesca sauce – our favourite red sauce.


 Step 3: Garnishing

IMG_1432 - CopyNow for the ‘sprinkles’! Crumbled feta made from raw sheep milk (thank you Canreg Station Farm & Pasture Dairy!), and minced fresh mint (also loads of that in our backyard right now!). The perfect meal for a hot summer night (well, any night actually!).

Quick, easy, and so fresh! Enjoy and experiment with your favourite pasta sauce and toppings.

Let me know what you come up with and how you like it!

Privacy Policy

Website Maintenance and Services by Andrew Wardell