August 22, 2016
By Anna Varriano
 [printfriendly]
Does anyone else remember that silly song “Beans in My Ears”? Its chorus started with the lyrics “my mommy said not to put beans in my ears”. It first became a hit single in 1964 and ended up being banned by some radio stations due to listener complaints and doctor reports about children putting things in their ears while the song was on the air!
What does any of that have to do with the recipe I’m sharing this month? Well, I happen to have beans coming out of my ears right now – and I didn’t put them in there! My garden has been overflowing with beans this year. It started about a month or so ago and it hasn’t stopped! As much as I love eating fresh and local green and yellow beans (love them just steamed and tossed with some butter and salt), I can’t keep up with what I’m harvesting, so I’ve started freezing them.
This month’s ‘recipe’ isn’t really a recipe – it’s instructions on how to freeze fresh string beans (green or yellow/wax) so that you can continue to enjoy their fresh goodness even when they’re no longer in season locally. I’m also sharing a link that will explain how you can freeze any other fresh veggies that you love and that are so abundant at this time of year.
Step 1: Prepping: Wash and Cut

Go through the beans and get rid of any that are ‘woody’ or rotten or really ‘rusty’. Wash the beans in cold water. Snap the stem end off of each bean. You can leave them whole if you like; however, I like to cut mine into approximately 2 inch pieces. I usually cut them slightly on the diagonal – just because I think they look nice like that when you use them in a soup or salad.
Step 2: Blanching
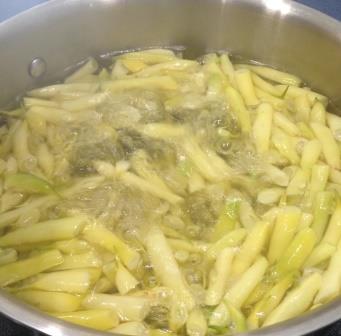
The term ‘blanching’ means to scald vegetables in boiling water or steam. It’s a pretty standard step for just about any veggie freezing you want to do. Blanching helps to retain the flavour, colour, and texture of the vegetable. It also makes sure there aren’t any harmful bacteria on the veggies. I used boiling water as I had a LOT of beans and my steamer wasn’t big enough. Bring the water to a boil, dump in the beans, and blanch them for 3 minutes. Start timing the 3 minutes once the water comes back to a boil. According to the National Centre for Home Food Preservation, if it takes longer than 1 minute for the water to return to boiling, you’re using too much vegetable for the amount of boiling water.
Here’s a link with more information on how to prepare various vegetables for freezing, including tips on whether to steam or water blanch, as well as blanching times recommended for different vegetables.
Step 3: Cooling & Packaging

Immediately after 3 minutes of blanching, I drained the beans into a colander and ran cold water over them until they were cool. It took just a couple of minutes. I took the cooled beans and spread them out on a clean dish towel and put another clean dish towel on top of them and just gently patted and moved them around between the two towels until they were dried off a bit. Then I put them into freezer bags (I used small ones so I could have ‘meal-sized’ portions), and put them in the freezer.
Now that I’ve almost got the overflow of beans under control, I’ll soon have to turn my attention to freezing my tomatoes!
Remember, good things groooooow, in Ontario! Here’s a link to a handy guide from Foodland Ontario that shows when various fruits and vegetables are in season. Enjoy all of this gorgeous local produce while it’s in season … and beyond!
[printfriendly]Join my email list and start living healthier!
- Tips & advice on healthier living
- Special promotions & offers
- Sent a few times a month to your inbox

Subscribe today and you'll receive a free e-guide that outlines the four key supplements you need for lifelong health!