April 13, 2018
By Anna Varriano
 [printfriendly]
When you hear ‘granola’, do you think health food or junk food? Wait … granola could possibly be junk food? As in bad for you? Yup. It sure can.
Some brands of store bought granola are loaded with sugar. Just read the ingredients to see how many grams of sugar are listed, and remember that 4 grams of sugar is the same as one teaspoon of sugar. In addition, some brands may contain unhealthy oils, rancid grains, nuts, and/or seeds, preservatives, sulfites, and artificial sweeteners and flavours. If you find a truly healthy granola, the price may give you a shock.
It’s easy and economical to make your own granola. This recipe is based on a granola cluster recipe from Angela Liddon’s Oh She Glows vegan cook book, I’ve made a few changes to suit my tastes and accommodate what I regularly have on hand. Feel free to experiment by using different nuts, seeds, and spices! The recipe makes about 6 cups of granola. By the way, the Oh She Glows cook book is awesome. So many delicious recipes!
Important note! When buying/using the nuts, seeds, and grains for this recipe – or any other recipe for that matter – make sure they are not rancid! If they are rancid, they will smell ‘off’ and taste even worse. If you are buying them from a bulk container, smell them first and if in doubt, ask if you can taste a sample. If you suspect even the slightest bit rancidity, do not buy them! Rancidity is caused by the oxidization of oils in the nuts/seeds/grains, and oxidized oils are not a healthy thing to put into your body!
What You’ll Need:

- an oven that is preheated to 275F and a parchment lined baking sheet
- 1 cup of whole raw almonds
- 1/2 cup of walnut or pecan pieces (I sometimes find the pieces are rancid while the halves are not. If that is the case, buy the halves and then break/cut them up into smaller pieces)
- 3/4 cup of rolled oats (if you want to avoid gluten, make sure they are certified gluten-free)
- 1/2 cup of raw buckwheat groats (so nutritious!)
- 2/3 cup of mixed dried fruits. You can use whatever you like. I like to use black mission figs, cherries, and apricots, then cut them up into raisin-sized pieces. Whenever possible, I buy organic/no sulfite dried fruits. If you’ve never compared an organic, sulfite-free dried apricot to a ‘regular’ one, please do so next time you can and see what differences you notice!
- 1/2 cup of raw pepita seeds (the little green pumpkin seeds)
- 1/4 cup of raw sesame seeds
- 1/3 cup unsweetened shredded coconut
- 2 teaspoons ground cinnamon
- 1/4 teaspoon of fine grain sea salt
- 1/4 cup local raw honey
- 1/4 cup melted coconut oil
- 2 TBSP of your favourite nut or seed butter
- 2 teaspoons pure vanilla extract
Step 1: Prepare the Nuts
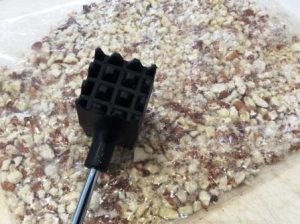
Turn 1/2 cup of the almonds into a coarse meal (sandy texture). The original recipe says to use a food processor, but I just put the almonds in plastic Ziploc bags (close the seal) and whack away at them with a kitchen mallet. Great exercise and stress release! :o)
Turn the other 1/2 cup of almonds into pieces using the same process (just don’t whack as long or as hard!). If you are using walnut or pecan halves, break them up too.
Step 2: Mix Up the Dry Stuff

Put the almonds, other nuts, oats, buckwheat groats, dried fruit, pepita and sesame seeds, shredded coconut, and cinnamon in a large bowl and mix together. Looks delicious already!
Step 3: Mix Up the Other Stuff

In a small measuring cup, mix together the honey, melted coconut oil, nut/seed butter, vanilla extract, and salt until well combined.
Step 4: Mixing It All Up

Pour the wet stuff into the dry stuff and mix it all up.
Step 5: Press It All Up

Dump the mixture onto the parchment paper lined baking sheet and gently press it down (just hard enough for it to hold together) into a 1/2 inch layer.
Step 6: Bake & Break

Bake for 40 to 45 minutes. If your oven tends to cook unevenly, you may want to rotate the baking sheet halfway through. You want the granola to have a lovely light golden bottom and also be firm to the touch. Once it’s done, take it out of the oven and let it cool on the pan for at least an hour. Then the fun part comes … break it all up!

Step 7: Store
I store my granola in a big glass jar. You can store it like this for 2-3 weeks in the fridge (if it lasts that long!) You can also freeze it in an airtight container/freezer bag for a few months – especially useful if you ever decide to double (or triple!) the recipe.

Step 8: Enjoy
Big chunks of this granola are a great snack as is – another snack idea to add to my ‘sugar craving buster‘ suggestions! I also love using it as a topping for a bowl of yogurt and berries. Enjoy!

Join my email list and start living healthier!
- Tips & advice on healthier living
- Special promotions & offers
- Sent a few times a month to your inbox

Subscribe today and you'll receive a free e-guide that outlines the four key supplements you need for lifelong health!